xiaoqiang tutorial (8) kinect v1 ROS driver test and installation
kinect v1 ROS driver test and installation
Xiaoqiang outputs a 12V power supply (DC head, labeled “kinect power supply”) for kinect power supply.
1. libfreenect test
Connect the Xiaoqiang host with monitor and keyboard and open a new terminal input on the Xiaoqiang host
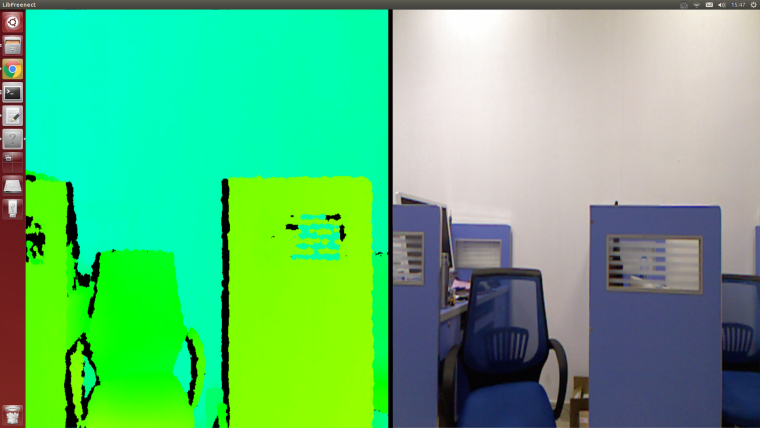
freenect-glview
You can see the similar figure below

2. ROS drive test
Close the program in step 1, open a new terminal, use freenect_launch to start the relevant kinect node
roslaunch freenect_launch freenect-xyz.launch
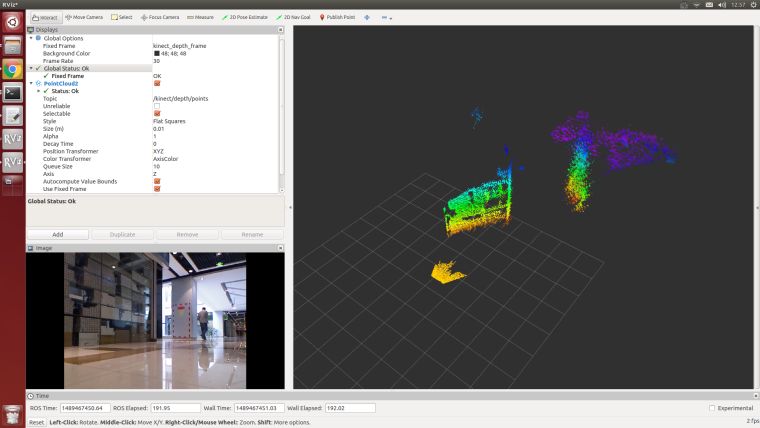
Open a new window to open rviz
rviz
Select the content to be displayed, such as kinect rgb image and depth point cloud, the display result is as follows
The settings of kienct functions is in /home/xiaoqiang/Documents/ros/src/freenect_stack/freenect_launch/launch/examples/freenect-xyz.launch
<launch>
  <include file="$(find freenect_launch)/launch/freenect.launch">
    <arg name="camera"                          value="kinect" />
    <arg name="motor_processing"                value="true" />
    <arg name="audio_processing"                value="false" />
    <arg name="rgb_processing"                  value="true" />
    <arg name="ir_processing"                   value="false" />
    <arg name="depth_processing"                value="true" />
    <arg name="depth_registered_processing"     value="false" />
    <arg name="disparity_processing"            value="false" />
    <arg name="disparity_registered_processing" value="false" />
    <arg name="num_worker_threads"              value="4" />
  </include>
</launch>
Turn on or off the feature by setting true or false
3. The following describes the ros driver installation procedure of kienct v1
If you use xiaoqiang system image, then you don't need to install the following drivers. These drivers were already install.
Need to install three software:
a.libfreenect
b.rgbd_launch
c.freenect_stack
a. libfreenect
First connect the kinect v1 to the xiaoqiang host, then open a terminal and enter the following code
cd Documents

sudo apt-get install git-core cmake freeglut3-dev pkg-config build-essential libxmu-dev libxi-dev libusb-1.0-0-dev

git clone git://github.com/OpenKinect/libfreenect.git
cd libfreenect
mkdir build
cd build

//The key point is, the following configuration will enable kinect audio and solve the installation path problem

cmake .. -DCMAKE_INSTALL_RPATH:STRING="/usr/local/bin;/usr/local/lib" -DBUILD_REDIST_PACKAGE=OFF

make
sudo make install
sudo ldconfig /usr/local/lib64/
sudo freenect-glview
You should see the output image of the kinect now , and then configure the peripheral privilege configuration
sudo adduser $xiaoqiang video
#Please replace xiaoqiang with your own computer's account name
Add a udev rule, first open the 51-kinect.rules file
sudo gedit /etc/udev/rules.d/51-kinect.rules
Copy the contents below and save and exit
# ATTR{product}=="Xbox NUI Motor"
SUBSYSTEM=="usb", ATTR{idVendor}=="045e", ATTR{idProduct}=="02b0", MODE="0666"
# ATTR{product}=="Xbox NUI Audio"
SUBSYSTEM=="usb", ATTR{idVendor}=="045e", ATTR{idProduct}=="02ad", MODE="0666"
# ATTR{product}=="Xbox NUI Camera"
SUBSYSTEM=="usb", ATTR{idVendor}=="045e", ATTR{idProduct}=="02ae", MODE="0666"
# ATTR{product}=="Xbox NUI Motor"
SUBSYSTEM=="usb", ATTR{idVendor}=="045e", ATTR{idProduct}=="02c2", MODE="0666"
# ATTR{product}=="Xbox NUI Motor"
SUBSYSTEM=="usb", ATTR{idVendor}=="045e", ATTR{idProduct}=="02be", MODE="0666"
# ATTR{product}=="Xbox NUI Motor"
SUBSYSTEM=="usb", ATTR{idVendor}=="045e", ATTR{idProduct}=="02bf", MODE="0666"
After logging off the user and reentering the system, you can now enable kinect directly without sudo.
freenect-glview
b. Install rgbd_launch
rgbd_launch contains generic launch files required by the driver installation package openni_launch or freenect_launch.
There are two main launch files:
processing.launch.xml:Install a series of nodelets to process data from the RGB-D driver openni_camera or freenect_camera, You can also set parameters to simplify processing nodelets images.kinect_frames.launch:Install the tf tree for kinect. The file can also be started internally from openni_launch or freenect_launch.
The rgbd_launch file contains multiple distributed launch files. But only processing.launch.xml can be modified externally.
cd ~/Documents/ros/src
git clone  https://github.com/ros-drivers/rgbd_launch.git
cd ..
catkin_make
c. Install freenect_stack
cd ~/Documents/ros/src
git clone  https://github.com/BlueWhaleRobot/freenect_stack.git
cd ..
catkin_make